|
In
this “behind the picture” article, I will not be explaining the
shooting setup, as it is a landscape photograph with no specific setup. I
will rather take you through the steps that I took in post-editing to
make the best out of the initial shot.
|
|
I use lightroom as a post-editing software. However, I will be explaining here the adjustments that were made, rather than the specific operations done on the software. You can use any software you usually use to go through the same steps.
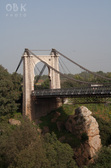
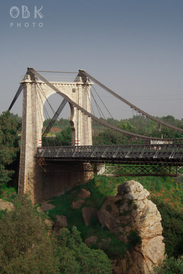
So here we go now. Let’s start with the initial shot.  Let’s start with the initial shot.
As you can see, the shot is far from being perfect. In fact, I was very disappointed when I first saw it on my computer screen.
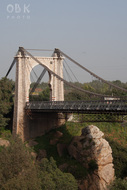
First thing is to straighten the image and crop it in order to remove all the disturbing elements.
Notice how the sky is dull? In fact, overexposure of the sky makes it loose its color. To correct that while keeping a natural look, we’re going to apply an ND filter. “ND” stands for “Neutral Density”. ND filters can be applied at the moment of shooting: it is a physical filter that has an upper part which is dark, and a lower part which is light, with a continuous transition in between. Here we are applying the ND filter at the post-editing stage: we are darkening the sky a bit without impacting the lower part, and with a continuous transition to keep the natural effect.
The
brightness of the sky is now much better, but the color is still a bit
dull. We’re going to boost up the saturation, but selectively on the
sky. This can be done in most post-editing software, either by selecting
the command and clicking on the sky, or by selecting specific colors in
the saturation command.
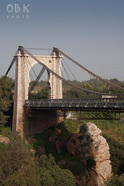
Notice
some small spots on the sky? In fact my lens was not a clean as I
thought. No problem, I use a tool which is called “spot removal” on
lightroom. There are equivalents in other post-editing software.
We’re
now done with the sky. But notice how the vegetation is dull (the
initial shot was really bad:)). We’re going to use the same tool as we
used before: increase saturation of the green color. We’re also going to
increase the luminosity a bit on that same color.
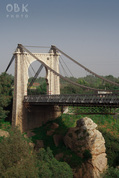
Almost
done. There is still one point that’s disturbing me. The shadow of the
bridge is too harsh and, to my point of view, that black stain on the
vegetation is not very beautiful. I’ll use here a tool called “adjustment
brush” in lightroom (again, there are equivalents in other software).
This tool allows me to select an area (the dark area) and apply a
setting (brightness, contrast, saturation) to this area. In my case, I
chose to increase the brightness of the area.
We’re
done. Not so bad a result starting from a really bad shot. Here is, for
your appreciation, a side by side comparison between the initial and
final shot.
|